Showing posts with label HotPatterns. Show all posts

Monday, August 09, 2010

Pattern Review - Hotpatterns Marrakesh Pants


Pattern Description: From Hotpatterns' Website - "Fabulously relaxed glamour in these stunning pants, designed for a drapey pants-weight fabric...try a fluid washed linen, heavy rayon blends, single or double knits or heavy crepe. Relaxed-fit straight leg pants sit around 1” below the natural waist and feature a drawstring waist with fly front zipper. Side seam pockets are topstitched down. Pants finish with a deep hem; optional buttoned tab allows the pants to also be worn rolled up. These are the perfect relaxed Pants and an essential addition to your HotPatterns wardrobe... relaxed at the waist but sleek over the tummy, hips and derriere. Make them in crepe and wear with a sequined tank for a modern night-time look; try them in a slouchy, fluid linen with a drapey knit top and soft jacket for everyday chic, or wear them in a stable cashmere knit with a matching Tshirt for superior lounging gear."

Sizing: 6-24. I made a 10

Fabric Used: Italian Stretch Linen in a deep olivey green, from Gorgeous Fabrics, natch.

For the waistband and pocket linings I used a cotton batik from Androsia in the Bahamas that I found hiding in my stash. It's at least 6 years old, probably 7 or 8. It has a lovely conch shell motif on it.

Needle/Notions Used: Stretch 11/75 needle, a couple of scraps of woven fusible interfacing, 5/8" elastic, one snap, a 7 inch zipper, Gutterman thread.

Did it look like the photo or drawing when you got through? Yes

How were the instructions? Meh. They aren't terrible, but I wasn't really thrilled with them. There are mistakes that should be fixed. Things like telling you to cut strips of interfacing for the fronts where the zipper will be placed. The instructions tell you to cut them 9 inches by 1 inch. In fact, the zipper closure for size 10 is 6 1/2 inches. So if you follow the instructions, you'll have interfacing extending into the body of the garment.

Also, the instructions tell you to cut a piece of elastic 1/3 the measurement of your waist. In my case, that was too long. I took 5 inches off the elastic. That worked much better.

Construction Notes: First, if you are taller than 5'6", you will want to add length to the legs. I'm 5'6" and to get the length I want for these pants, I used a 1 inch hem. If you're tall, be prepared to add on to the legs.

I cheated on the waistband. I'll admit it. I copied a pair of Loft pants that I have and just sewed both raw edges of the waistband to the raw edge of the pants. Then I finished the edges with a three-thread overlock. I tacked down the SA's at the side and back seams, and at the front. Hey, it works!

I also decided to have a little fun with the seam finishes, and I used bright red thread in my overlocker.
 Nail polish color: Fiercely Fiona by OPI

Likes/Dislikes: I like the style of these pants. I like the fact that they go together easily. I like the way they look on me.

Now for the dislikes. Okay, first let me say that these pants turned out really well. So, none of the issues I'm about to discuss are dealbreakers. All of the following are what I call "broken shoelaces" - little things that are minor irritants.

First, I'm not satisfied with the placement of the buttonholes for the drawstrings. They are (IMO) too close to the center front. Do yourself a favor and do a quick mockup of the waistline and determine where you want the openings. I think you will want to move them.

Second, the pockets are one size fits all. That's fine for sizes above 10. But if you are making a 10, 8 or 6, the topstitching for the pockets and the topstitching for the fly front will intersect and/or conflict with each other. I ended up topstitching a second time over the fly, ending at the curve of the fly-front. Then I turned the garment over and, working from the back side, I stitched the rest of the way around the pocket. You can see a picture here:
If you look about halfway down the pocket, you'll see where I stopped the stitching on the front and picked it up again from the back. This works because I was using matching thread. If you want to use contrast thread, you will need to work out your construction steps differently.

There were also a few other really minor things that I wish were different. For instance, there are next to no notches on this pattern. There are notches at the bottom of the pant legs, and there is a double notch at the back seam. That works fine for me. But I could see the usefulness of having notches or markings at the bottom of the pockets. Also, there is no marking, at least on the pattern that I have, for the button/buttonhole placement at the top of the zipper. Deal breaker? No. But the pattern is listed as being appropriate for advanced beginners, so I think it would be nice to have these things laid out explicitly.

Would you do it again? Would you recommend it? I may do it again. I would recommend it for confident sewers. It's not difficult, and it does produce a great result.

Conclusion: Here's a picture on Shelley

Tuesday, August 03, 2010

Now What?

Have you ever had one of those days? I've had two. In a row. I'm not going to bore you with the details, but I can say that one of the problems was of my doing, the rest were not. Give me a gun and a bottle of scotch.

Edited to clarify - the problems didn't have anything to do with cancer. One was that I inadvertently hurt a friend's feelings and the others had to do with a supplier to my business. I'm okay, really! Thanks for the concern!

Anyway, now that life is settling back into normal, I need a project to get me through the rest of summer and into transitional. So I think I'll hop on the Marrakesh Express and make a pair of pants:

I think I'll make them from this Stretch Linen

I like it because I can wear it now through the cold weather. If we ever get cold weather, that is. I know, the Northeast hasn't been hit as hard as the rest of the country so I shouldn't whine, but it's been that kind of two days.

I also dug this Jalie pattern out of my stash:

I've had it in my stash for several years. I think I'm the only person in North America who hasn't made it yet, so it's time to get on it. I'm just going to make it from a White Rayon Jersey. I may also make the sleeveless version in a White Silk Jersey (sold out right now, sorry!) that I have in my stash. Those projects should keep me busy and out of trouble for a while, I hope!

Happy sewing!

Saturday, November 21, 2009

Pattern Review - Hotpatterns Uptown Downtown Knit Dress

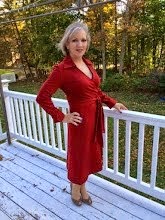
... But this one will be my Thanksgiving dress!


Pattern Description: From Hotpatterns' website - "Simple to make and easy to wear, this super-cool Dress is a great modern take on the classic sweatshirt, and works in all sorts of knits...try T-shirting, silk-y jersey, sweatshirting, double or single knits, or ribbed knit fabrics. Use contrast or matching ribbing or self fabric to finish the neckline, hem & sleeves. Relaxed-fit Dress has a scooped balletstyle neckline and a choice of cap, elbow length or full length raglan sleeves with an overarm seam for a superior fit. Bodice can be worn bloused over the elasticated waist or dropped down onto the upper hip. Skirt finished just below the knee. We’ve included instructions for the optional narrow and Obi-style tie belts, plus the infinity scarf. Depending on your fabric and sleeve length choices, this is a true year-round style...wear it with knee high boots or opaque tights and a chunky heel when it’s chilly, try it with sheer nylons and a chic heel, or team it with strappy sandals for warm-weather style."

Sizing: 6-26. I made a size 12

Fabric Used: NY Designer Midweight Rayon Jersey - Heathered Chocolate from Gorgeous Fabrics (of course!)

Needle/Notions Used: Well, I sewed most of this on my industrial Juki but the one part I didn't, I used a Stretch 75/11 needle and that's what I recommend for working with this fabric. The only other notion I used was 1/4 inch elastic.

Did it look like the photo or drawing when you got through? Yes, most definitely!

How were the instructions? They were fine. This is a beginner-rated pattern, and it went together in under 2 hours (after tracing my size).

Construction Notes: Nothing really. I've read some reviews where folks have said they would do the waistline elastic insertion differently, but I didn't have any problem with it.

Any changes? Hotpatterns recommends using ribbed knit. I had a lead on a knitting company here in the States to manufacture 2 to 4 inch ribbed knit, but it appears they went out of business recently. :( So I used self fabric instead and it turned out great.

Likes/Dislikes: LOVE. IT.

Let me say it again: LOVE. IT. Not just because I am a fan of Hotpatterns in general. This is a great little dress that looks terrific on lots of different body types. It's also going to be great for Thanksgiving. Drapey, flattering, and turkey-forgiving. What's not to love?

Also, I really like the fact that all the edges are finished with a folded knit edging. Hotpatterns recommends using rib knit. A friend gave me the name and address of a US-based rib knit manufacturer and I wanted to source from them. But alas, they seem to have gone out of business. Sigh. So I used self fabric and that worked beautifully with this knit.

Would you do it again? Would you recommend it? Oh god, yes, I'll make this in lots of fabrications. Really. I don't gush about many patterns but this one is great and goes together quickly. It's flattering and you can dress it up or down.


Conclusion: Big winner! Here's my finished version with a belt and boots. I'll probably use a different belt (off to Nordstroms tomorrow). But I love it with boots and it's so comfy! Here's a picture of the finished version on Shelley.

Friday, November 13, 2009

Lingerie Lust

I haven't had any desire to sew lingerie before. I've made bathrobes for various family members. But I'm not into making my own bras, panties, negligees, teddies, camisoles, garter belts, or anything like that. I think that's about to change! Hotpatterns just released some a new collection called Boudoir of Bliss (cheeky devils, Trudy and Jeremy!) Bliss is right. There are three patterns in this collection that I'm positively drooling over. First Up, the Trousseau Nightgown and Robe.

How do I love this? Let me count the ways. I'm particularly gaga over the gown. I love the lines, I love the drape, and I just got in the most perfect 70-denier microfiber jersey to make it with. I'll have that up on Gorgeous Fabrics tomorrow, and I'll place an order then, too. I'm not generally a big robe gal, but I think this will make a lovely exception. And I can wear it when I don't feel like schlubbing around (not like I ever really schlub around) in my plaid fleece robe.

The second pattern that caught my eye is the Buckingham Beauty Nightgown and Nightshirt. On nights and weekends when I am not in the mood to be a sexy thang, this is the kind of sleep shirt I love. I go for the shorter version. This will look great in a cotton shirting like this Striped Cotton Shirting in Blue and White.

The third one I want want want is the Bel-Air Lounging Pajamas. I just love the idea of making it with Silk Charmeuse in True Red, using the face for the bulk of the garment, and the matte reverse for the trim. I'll probably make a camisole to wear underneath the robe. I like camis with my jammies. The rest of the collection looks great too. But these are the three that I'm going to buy.

I'm almost done with my dress. I got slowed up earlier this week when I got some news that knocked the wind out of my sails. But today I sat down and put it all together except the CB seam. I'm debating between a lapped zipper application or an invisible zip. I think I'll go for the latter. I hope to have it finished by Sunday night.

Tomorrow is the monthly meeting for the New England Chapter of ASDP, of which I'm program chair. If you're in the Boston/Worcester area, it's going to be a great meeting and it's open to the public! The speaker is Jennifer Stern of J Stern Designs. She's giving a talk on making jeans, with lots of samples, examples and demonstrations. The details are as follows:
Date: Saturday November 14, 2009
Time: 1:00 PM
Cost: Free for ASDP members, $20 for the general public. It's going to be worth it!
Address/Directions: 12 Woodward Avenue, Berlin, MA
From Route 495:Take the RT-62 W exit, EXIT 26, toward BERLIN/CLINTON. Turn LEFT onto MA-62/COOLIDGE ST. Continue to follow MA-62.  2.0 miWoodward Ave. is on the right and Town Hall is on the hill to the left at #12 Woodward Ave.

That's all for now. I'm tired. It looks like it'll be a good weekend to finish my dress. I'll post pictures and lots of information as soon as it's done.

Happy sewing!

Sunday, October 25, 2009

The Pants that were Not Meant To Be

Today has been one crazy day. We've had people stopping by that we hadn't seen in years, and both sons have places they had to be early. DS the elder is marching with the high school band at the Woburn Halloween Parade, a very big deal around here. DS the younger is doing an exhibition dance at Tufts University. I tried to sneak time to make my Razor Sharp Pants. I got the zipper replaced, and in doing so came up with a much better way to apply a fly zipper than any of the books and patterns tell you to. I'll do a tutorial on that at some point. So I sat down, got the inseam sewn up and went to the serger to finish the seam allowances. The phone rang. It was a minor emergency. Done, taken care of. I sat down and started serging. The phone rang again. Another very minor crisis. I sat down and continued serging. I finished the first side and the phone rang again. This time it was DS the elder trying to figure out timing for parade and Confirmation class tonight.

Finally, I get a little uninterrupted time and I start on the other seam allowance. Halfway up, I see that tragedy has struck. Somewhere between all the phone calls on the first side, I managed to serge the center of the pant leg front into the seam allowance, cutting a big hole in the process.
Yep, that would be in front, at mid-thigh. There's nothing to do with it but drop back and punt. Here's the heartbreaking end to a frustrating project....
I think someone was trying to tell me something with these pants. They were just never meant to happen. I still have lots of this fabric left, and I really love it (sniff, sniff!) so I am going to start on my McCalls Dress. And this time I'm not answering the phone.

Dontcha Just Hate When that Happens?

So here I am, chugging happily away at my Razor Sharp Pants. The fly is in and looking perfect; I'm pleased with my matching of the plaid. I trimmed off the top of the zipper in preparation for applying the waistband.

Then it happened.

Yep. I did it. I pulled the zipper just a wee bit too far and....

BAMNNNFFF!

I spent a good long time ripping out the zipper to reapply it, cursing myself the entire time. That's it. Next time I'm going to say to hell with it and shorten the zipper before applying it.

Parting Shot: Dance Exhibition!
DS the younger was in a show at the studio last night. They did a couple of group dances with a bunch of the kids. The first was just the kids
The second was kids partnered with pros from the studio. DS the younger was paired with Sarah, who's wearing the red dress. Cool note about her - besides being a great dancer and an absolute sweetheart, she and her partner Evgeni (to her right in the back row) took 36th at the Worlds in Tokyo this year.
The kids did GREAT (the pros did okay, too) and they all had a blast.

Now back to the damned fly.
Happy sewing!

Sunday, October 18, 2009

Not to Put Too Fine a Point on it but...


This weather sucks. This is the second discernible snowfall we've had in three days. I know, other places got more snow than we did, and it won't last long, but still - it's Frickin' October 18th, people! (Not you, dear readers, the powers that be) Give us a break here!

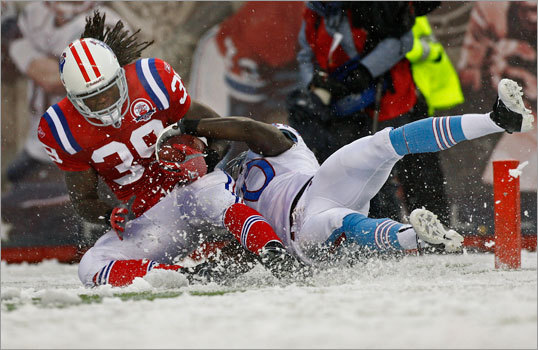
On the plus side, I've cut my Razor Sharp pants in my Loro Piana fabric. I'm listening to the Pats from the comfort of my home. I had the opportunity to bid on 2nd row seats to todays Pats/Oilers (Titans now, but it's a legacy game so they are wearing the old Houston Oilers uniforms), but I knew what the weather was going to be like, so I passed. I'm glad I did, too - apparently it's snowing even harder in Foxboro.

You know why I had the chance to bid on those tickets? Because DH's band. Booty Vortex, played a gig to celebrate the City of Somerville being voted one of ten All America Cities. Um... okay. But it was a great time and they auctioned off a bunch of things (mostly sports related) to benefit programs for disadvantaged kids in Somerville.

So the Parting Shot is...
Bootylicious, y'all! DH is playing the bari saxophone, third from the left.
They did a great job, and it was an all-ages show so the kids got to come too. More on the pants later.

ETA: Congrats to the Pats! That was an embarrassment of riches. I'm still glad I didn't bid on those tickets. Besides, they ended up going for $350. Paying $350 to get my butt froze in January during a playoff game? Sure. Paying $350 to get my butt wet and froze in an October snowstorm? Mmmmm, no thanks... But good for the Pats!!!
Globe Staff Photo: Jim Davis
Now, GO BILLS!!!!!!!!!

Happy sewing!

Thursday, July 16, 2009

The Two-and-a-Half Hour Transitional Skirt


It's July. That means that the stores, catalogues, and pattern drawers are starting to fill with fall and winter fashions. Vogue Patterns, in particular, has come out with a collection that hits it right out of the park. But...

It's July. That means it's hot and humid here in Boston (finally!) and for the first time since last year, the thought of working on a woolen or cashmere fabric is not really appealing. So what's a sewing maven to do? Make a skirt from a season-spanning fabric, of course! I decided to make a pattern I've used before, HotPatterns Plain & Simple Pencil Skirt. This time, to keep it really plain and simple, I omitted the lining. I used HP's pattern, but a couple of other great options for pencil styled skirts that will work up quickly are Vogue 8603 View C (which has princess lines, so you can fit it easily), Simplicity 2564 View D, and Butterick 5934

For the fabric, I wanted something that was cool enough to wear now and into the fall I decided upon Italian Petite Houndstooth Cotton Stretch. To make this in my size (a size 10 in the HP pattern), I only needed 1 yard (not even) of the fabric. For any of the patterns I highlighted, you can use one yard or less for a size 14 (big 4). The recommended yardages are higher than you'll actually need. Since the skirt is unlined, I finished all the seam allowances and hems with my serger. The only slight change I made to the pattern was to use a lapped zipper application, which you can see here:

I hemmed the skirt by hand, using Els' fantastic tutorial from The Sewing Divas. The entire project took me 2 1/2 hours (hence the title of this post) and cost me the price of one yard of fabric. If I had done a centered or invisible zipper, it would have taken me even less time. Ditto for if I had done a machine blind hem. And now I have a skirt I can wear for the rest of the summer and right to the really cold weather!

Parting Shot: Orange Nails!
I borrowed this idea from Cidell. Normally my nails are either bright red or neutral color. But this week I decided to go for the spicy approach and I went with bright, bright orange. It's an OPI color called "Don't Bet Against OPI". Whoever names their colors has the most fun job!
Yeah, they're my nails. I don't have acrylics or gels or anything. I tried acrylics once, but they drove me crazy, so now I just keep my nails short and polished. My toenails are painted bright blue, but I won't be posting pictures of my feet any time.

Happy sewing!

Wednesday, December 24, 2008

Pattern Review - HotPatterns Envelope Clutch


Alright! After sitting at my sewing table stumped, uttering a few well placed curses and stomping downstairs, I figured out how this thing is supposed to go together! Truth be told, it's very straightforward, but I could not figure it out yesterday. But I managed to get it together and now I have a stocking stuffer for my BFF. So here you go, with my own illustrations:

Pattern Description: From HotPatterns' website, "The must-have clutch, inspired by a fabulous Prada piece seen in the fashionista-favorite SATC movie. This Clutch is perfect for real or faux suede or leather, but it will also work in fabrics like heavy denim, tweed or corduroy. Oversized, lined, slouchy Clutch has a carrying strap on the back and closes with a zipper under the front flap; flap also features concealed magnetic closures. Clutch is completely flat, and the interior has 1 large zippered pocket and a smaller open/cell phone pocket. This fashion-forward Clutch is perfect for stowing inside your bigger everyday tote-keep your phone, keys, wallet and important papers in it for easy access. Wear this killer style in a fabulous color to rev up your work wardrobe, or make it in a luxe embellished fabric for a modern evening accessory.

Skill Level: advanced beginner"

Sizing:Again, from the website: "Finished clutch is 11' high and 17' long"
Actually, I think they mean that it's 11 inches (not feet) high and 17 inches long.

Did it look like the photo or drawing when you got through? Ultimately, yes. It took me some brain twisting to get there, though.

How were the instructions? The instructions were so-so. This is the kind of pattern that, while not difficult at all, requires very specific illustrations to make it clear, at least for me. The written instructions are adequate, but I could not make heads nor tails from the illustrations of the zipper assembly. So here are my pictures of the steps for applying the back strap and the zipper. Hopefully they'll be helpful to you.

First the Back Strap: This is actually not difficult at all, but I thought these pictures might help some folks to figure out how to apply the strap, since the instructions specifically tell you that you should not be able to see any stitching on the strap itself. The first thing you do is stitch the strap to the back at the placement dots on one side:
Then you pin the strap to the back on the placement dots for the other side, turning under like so:
Aren't you glad I used such a high contrast fabric? Are your eyeballs vibrating yet? Mine were. After you have it pinned in place, carefully stitch along the stitching lines. You'll want to sneak your presser foot in there, and you have to do a little futzing to keep the strap out of the way, but it really isn't hard. Here's a picture as I was sewing the strap

Ta daa!

Next up, the d*mned zipper
This was the part that nearly drove me to drink. Okay, it did drive me to drink, but not until after I'd figured it out. The key to knowing how this goes together is to keep in mind that the zipper sits under the flap and provides the opening into the lining. It took me a while to get that point of reference to sink in.

So here's what you do. You sew the tops of the lining pieces together, leaving an opening that is large enough for your zipper. Baste the opening closed (sounds weird doesn't it?) and press your seam allowances open. Then turn the lining over so the wrong side of your lining is facing up toward you. Center your zipper over the opening, with the wrong side of the zipper lying against the wrong side of the lining. Baste the zipper in place. Here you can see the result
Sew the flap piece to the bag front piece the same way as the lining, leaving an opening for the zipper. I basted the zipper opening and pressed the seam allowances. Then I took out the basting so I could see the rest of the construction.
Place the bag front/flap piece right side up over the zipper/lining (so your wrong sides will be facing eachother). Stitch along the zipper through all layers. This will attach the lining to the outer bag at the zipper.

Once you have the zipper attached, it's really a piece of cake. Maybe I was just having a "duh" moment (qui, moi?). But it worked out okay.

Materials Used: Wild Thing Reversible Cotton from Gorgeous Fabrics. For the interfacing, I used fusible hair canvas from Pam Erny at Fashion Sewing Supply. I used a zipper and snaps that were in my stash from my handbag manufacturing days.

Any changes? Nope.

Likes/Dislikes: I love the size and style. This was my test run before I cut into my leather. No dislikes, I just needed some clarification.

Would you do it again? Would you recommend it? I am going to do it again. I do recommend it, and hopefully my pictures will help.

Conclusion: I think BFF will like it! Here are pictures of the finished front, back and zippered lining.
Front

Back

Zipper/Lining

Happy sewing, and Merry Christmas!

Tuesday, December 23, 2008

This Bag is Really Starting to P*ss Me Off...

I'm at a point where I'm going to put the bag down and step away from it. Let me say this up front. I love HotPatterns. I also know what an unmitigated b*tch writing instructions can be. But I can not make sense of this zipper/lining assembly to save my life. So I'm going to step away from the sewing room for a few hours, have a glass of wine or three and go back to it in the morning. Part of the problem is that the illustrations are not helpful.

I'm not ready to punt. This is close, but it's very frustrating. Once I do figure it out, I'll take pictures so you can see what I do.

Update on Christmas Eve
I didn't even need the glass of wine. As soon as I finished typing this original post, I had figured it out in my head. I am all done except for the snaps, which I'll put on after I mail out all the international and Alaska (hi Dawn!) orders at Gorgeous Fabrics. Someone asked why I didn't call HotPatterns and ask them how to fix it. The reason was two-fold. First, the problem wasn't theirs. It was mine. The instructions explained how to do it, I just could not visualize the process. Second, I'm one stubborn Irish chick, and goshdarnitall, I was going to figure this little bugger out myself! There was one other factor that made it difficult and that was the fact that I was using a self fabric lining. I think if I had used a different lining fabric, I might have seen how to do it sooner. Anyway, I will review it later today.

BTW, I did have wine. Two glasses, not three!

Happy sewing!

Sunday, December 21, 2008

Time to Make a Christmas Purse

Happy Hanukkah to everyone that celebrates it, and Happy Solstice to those who just need an excuse!

Now that the Michelle Obama coat is done (for the moment), I want to make a Christmas bag. So I think I'll make an of-the-moment clutch, using HotPatterns Envelope Clutch.

I'm going to make it from some fabulous leather I bought at Leather Suede Skins. I think this will look great with the coat! The printed ponyskin will be the outer shell, and I'll line it with the lambskin.
This picture reminds me of something I left off my post yesterday. I took the photo on my ironing board. When I did the final pressing of my coat yesterday, I put a fluffy towel on my ironing board to keep the nap of the cashmere from being flattened. Also, when I did the final press, I used very light pressure and steady but not heavy steam.

Today should be a good day to hunker down in the sewing room and make the purse. We got about a foot of snow yesterday and it's snowing right now. The weather folk are predicting 3-6 inches here today. So it's beginning to look a lot like Christmas. Here's a picture from my front door this morning.

Happy snowing!

Tuesday, August 19, 2008

Saucy Secretary Part 2 - Finished Look

Ta daa! The Saucy Secretary is finished! The top, which I previously reviewed Here, is made from Kwik Sew 3093. The skirt is made from HotPatterns 24/7 Pencil Skirt:


I did a muslin before and reviewed it in This Post. That time I ran it up primarily for fitting and general construction. This time I did a few things differently. The biggest difference was that I lined the skirt.

Fabric: For the shell, I used a (sold out, sorry) "Just Gowachuss Wool Tweed" in heathered purples from Gorgeous Fabrics.

I lined it with a paisley purple and brown georgette that I have had in my stash for so long, I forget where it came from. I bought it when I was manufacturing accessories, and I have a ton of it. Georgette, as long as it's not crepe georgette, makes a great lining. It's like chiffon, but heavier, and it feels great. It slides beautifully too.

I interfaced the hem with Pro-Weft interfacing from Fashion Sewing Supply

Cosntruction Notes: There are a couple of things I did differently from the last version of this skirt. In addition to lining it, I decided to cut the waistband facings from the lining fabric to reduce bulk. I cut the facings a scant 1/8th of an inch shorter than the waistband. This was to ensure that the waistband rolled in towards the facings to eliminate any possibility of facing "peek out" at the top.

I also constructed the skirt slightly differently from the way most directions have you make skirts. I sewed the skirt to the waistband, then I sewed the lining to the facings. I inserted the invisible zipper in the shell, then I machine sewed the lining to the skirt, starting at one side of the zipper, across the top of the waistband facing and finishing at the other side of the zipper, all in one continuous line of stitches. I understitched the facing. To affix the lining and the skirt waistbands, I used the "stitch in the ditch" technique along the seam between the skirt and the band. You can see the results here:


There was only one thing I found odd about this pattern, and that was the lining. HotPatterns has you cut the lining out so you have a large "U" around the back vent.

It's not a bad thing, it's just different from the way most patterns are cut. So you may want to consider getting a good sewing book and cutting your lining in a more traditional fashion. As it is printed, you need to make sure your back seam allowances are finished. But that's a pretty minor nit. Here is a view from the outside:

Conclusion:
I really love this version of the skirt. I highly recommend it. I think it will look fantastic in the cooler weather with my boots and my La Rue Bag. Today actually feels like early fall. The air is nice and crisp. It almost makes me want to wear it!

Happy Sewing!

Saturday, August 02, 2008

Pattern Review - HotPatterns 24/7 A-Line & Pencil Skirts


Pattern Description: From the HP website: "Loving these groovy, stylish skirts, designed for any and all skirt fabrics, from denim to broderie anglais, from suede to cotton, from tweed to crepe. Fitted Skirts finish *just* below the knee and have front & back darts, a center back invisible zipper, optional lining and a contoured waistband that sits right at the natural waist. A-Line skirt has a gentle, controlled flare and a bias-faced hem; Pencil skirt is ever-so-slightly tapered with a deep hem and a concealed back slit. Try these hard-working pieces with a matching jacket as part of a chic suit and as indispensable co-ordinates for your everyday wardrobe. These great skirt styles will showcase a gorgeous fabric, or act as an inspirational blank canvas for all your favorite trim and embellishment ideas and techniques."

I made the Pencil Skirt version

Sizing: 6 to 26. I made a 10

Did it look like the photo or drawing when you got through? Yes

How were the instructions? They were great. This is a very straightforward skirt. It's well drafted and, if you opt not to line it (as I did in this case), it is a wonderful skirt for a beginning sewist.

Fabric Used: Wool tweed left over from making the Making a Jacket Series on BeSewStylish (now CraftStylish).

Any changes? None. This is a muslin. Not a wearable muslin - I don't do wearable muslins. This is going to Goodwill tomorrow. It's perfectly wearable, and it looks great, but I wanted to try making it up for fit and construction tweaks before cutting into my Sexy Secretary Skirt fabric for the real McCoy.

Likes/Dislikes: No dislikes. I love the pegged line of this skirt. It's exactly what I am looking for this fall. Very "Mad Men". I'm a little tempted to peg it even more for the final version, a la Michael Kors' Fall 2008 looks:
Photo: Style.com

Any Changes? As I said, this is a muslin, so I made it as-is to check the fit and look on me. There are a couple of changes that I will make for the purple version. First, to eliminate bulk at the waistband, I'll make the facing from petersham ribbon or lining, not self fabric. The waistband is contoured, and as you can see here, it's pretty bulky in this fabric.

Second, after trying it on, I decided to lengthen the front darts by 3/4 of an inch. The way they hit before looks a little poochy. I made the change on the muslin and the look was much more to my liking.

I'm debating whether to add pockets to it. The pattern has no pockets, I like having pockets in skirts, but maybe I'll just skip them to keep the lines clean.

Would you do it again? Would you recommend it? I am going to do it again, and I definitely recommend it. On me, this skirt hits just at the knee. I really like that. But it's also very easy to lengthen or shorten it so you get exactly the look you want. I thought about making it longer, like the Kors looks, but that might be a little matronly on a 5 foot 7 inch me.

Conclusion: Classic, stylish - a real winner!

Sunday, July 27, 2008

Progress, but Not Much to Show


I'm making a trial run of the Naughty Secretary skirt in the same fabric I used for the BeSewStylish Jacket (now CraftStylish). I'm making it with the HotPatterns Pencil Skirt Pattern. It's coming along beautifully. I'm not going to line it, since this is essentially a giveaway. I'm going to make it for fit, make note of any adjustments and make them to the pattern piece, then give the muslin to Goodwill. I am going to miter the hems at the vent in back, to practice for the final version. There are several good tutorials online. One I particularly like is on Sigrid's Blog. She used the approach for a sleeve vent, but it works equally well for a skirt vent or jacket vent.

Also, if you were on Gorgeous Fabrics last week and noticed some performance degradation, I'm sorry for that. There was a technical issue at our hosting site that caused timeouts and some lost data. It's fixed now. I don't think we lost anything important (like your orders) but let me know if you are waiting for a response from us and haven't received it yet.

I should have the muslin of the skirt finished tomorrow. I'll review it then. Until that time,

Happy Sewing!

Wednesday, July 23, 2008

What's Next (I Think)


It's July. It's hot. It's the middle of summer and we are getting daily thunderstorms here. So I think it's time to start channeling fall! I've been jonesing over this pattern for a while, and I think it's time to channel Mad Men and make the pegged version. I'm going to do a muslin first, but I'm thinking it will make a fantastic fall skirt with This Tweed from Gorgeous Fabrics:


And I think I'm going to pair it with a top (I'm thinking turtleneck) made from Rayon Jersey in Deep Eggplant.

But then, lately my project plans have been as changeable as the weather, so we'll see what actually gets cut out. I have traced off the skirt in a size 10. So keep an eye out!

Happy sewing!

Monday, July 21, 2008

Pattern Review - HotPatterns Homage Tote


Pattern Description: From HotPatterns' website: "Celebrating the design genius of the legendary Yves Saint Laurent, and inspired by the YSL Tribute bag, this fabulous oversized Tote is designed for decorator canvas, denim, corduroy, twill or brocade-but it will also rock in real or faux suede or leather. Oversized Tote has a darted base, with shoulder straps, snap or magnetic fastening, optional luggage-tag trim, and side zipper openings at each side. Tote is lined with interior zippered, cell phone and small open pockets. This spectacular Tote will make a great everyday bag for all seasons...make it in sturdy canvas for a perfect beachbag; try it in real or faux suede or leather for work; work it up in denim and pad it with some quilt batting for a totally stylin’ laptop/notebook bag."

Sizing: Humongous! I think I could smuggle a medium sized dog ("Here Hoover!") in this thing. Here's a picture of the main pattern piece:


Did it look like the photo or drawing when you got through? Yes, with some minor changes (see below)

How were the instructions? Dunno. I didn't use them. I did a few things differently from the way they have it laid out in the pattern pieces, and I'll explain that below.

Fabric Used: For the front, loops and one facing, I used a small piece of zebra print patent leather that I bought from Leather Suede Skins in New York several years ago. The remainder of the bag is black leather that I had left over from when I manufactured handbags. The oval rings are from a visit that Gigi, Phyllis and I made to Pacific Trims in New York a couple of years back. The lining is black nylon pack cloth, again left over from my bag manufacturing days.

Any changes? Yes. First off, I ended up piecing the front and back sections. If you are working with leather, make sure you have a hide large enough. If you don't, or if your hide has the occasional hole in it (as is the case with the pony skin I plan to use on the next version), then you'll need to piece it. HotPatterns is kind enough to mark the center line on the pattern piece, so just fold it in half and add a seam allowance (in my case, I added 1/2 inch) and cut:

Flip the pattern piece over and repeat for the other side. I needed to piece the front and the back, thanks to 1- not enough of the zebra stripe patent leather and 2- small holes in the black leather hide.

Second, I didn't make my straps the way they suggested. Instead, I made them in much the same way that Gigi described in her Prada Key Leash Tutorial. The difference was that I didn't glue the straps together. I may do so on the next version. Before stitching them together, I applied interfacing to the black leather to support it.

I didn't bother interfacing the patent loops - the patent leather has enough body and no stretch. Similarly, I interfaced the black leather facing, but not the zebra patent. I did, however, use a small piece of leather to reinforce the back of the magnetic snap on both facings.

I applied the snaps prior to sewing the facings to the lining body. It makes life a lot easier. I think the instructions tell you to do that.

Another thing to note when working with leather, or any thick fabric for that matter. When you are sewing the straps to the bag, at one point you will be sewing through at least 6 layers. That's a hard task for any machine, so breathe deep and take your time.

You can also see my tips for working with leather in This Post.

Likes/Dislikes: This is a very, very cool bag! I love the creativity it allows. Have fun with and don't scrimp on your hardware for this bag. The only thing it requires is 4 rings for the straps. Make them interesting and you'll have a great bag to show for it! On the next version I make, I'm going to use some Riri zippers instead of the stock ones I had in my stash, and I'll probably get some kewl rings from Pacific Trims for the straps.

Would you do it again? Would you recommend it? I would and I would! This is a winner of a pattern. It is ginormous, so if you aren't as amazonian as me (in stature or attitude), you might want to scale it down a tic before sewing it. But it's a great pattern that goes together easily.

Conclusion: Love it! I can't wait to get my ponyskin to make the next version!
Here's a picture of the front:


And the back:


And here's a shot of the inside:

Howd'ya like that zipper, eh? I thought about putting a tasteful black zipper in there, but then I realized I'd never find that pocket, so instead, can you say bumble bee? Bzzz....

Happy sewing!